Git and GitLab usage
Warning
Make sure that you have read Git and GitLab Intro.
Motivation
This part of the course explains how to use Git and GitLab for basic usage. While completing it, you will set up the Git and GitLab environments that are used throughout this course. You will be able to create a new repository, collaborate with other developers and execute day-to-day Git commands.
In our view it is vital to learn how to use Git on the command-line. Typing these commands by hand and evaluating the resulting messages will give you a deeper understanding of how to use Git. When using automatic and often graphic interfaces at a later stage you will benefit from this when debugging errors and understanding unexpected behaviour.
I hear and I forget. I see and I remember. I do and I understand. - Chinese proverb
To learn Git is to do Git. There is no way around it: you will need to use Git frequently to understand its workings and remember the different commands. The assignments in this document will help you on the way and provide some basic commands. We urge you to do these assignments and – even better – try other commands as well!
Introduction
Typically you would like to have to following order of events:

There is a dire need for the implementation of some idea. After some intensive brainstorm-sessions and the use of many sticky notes, a team of creative programmers is formed. It is decided which project management methodology to follow (Agile, Scrum, Waterfall etc. etc.) and to use GitLab for maintaining the code, documentation, issues, testing and deployment. The developers start to work systematically, implementing the specifications of the project management and within the expected time-frame the final program is ready for dissemination.
Yeah, right!
True, while writing millions of lines of code each year, which is business as usual in many big companies, this is the ideally preferred and envisioned course of program development. However, more often the writing of code in practice will be more along the following lines.
First iteration
For your research you would like to implement your idea, algorithm, service or whatever it may be on your computer and you start writing the first version of your program in a single file. After some time of saving the changes to the same file again and again it becomes hard to back-track ideas or try out sidetracks. You solve this to some extent by time-stamping the files. Unfortunately, this very soon results in a large pile of files making it hard to navigate and to keep track of the content of all versions. A much better solution is to use Version Control software and you decide to keep a record of these revisions by storing your file in a Git repository. Typically, this is performed by iteratively going through this loop:
$ git init
### LOOP
# write code in <file>
$ git add <file>
$ git commit -m "<comment about changes>"
### END LOOP
Note
Observe that in the above example git commands are given on the command line. It is very likely that writing the code will be done in a programming environment like Matlab, Spyder (Python), Visual Studio Code or any other IDE (or even a text-editor). Most of these programs have a convenient and often graphic method for Git management.
With git init a .git directory is created which will be used by Git to keep all repository related information locally. Storing the changes in files in the repository is in general a three phase process:
- create or change a file
- add this file to the staging area of Git
- if satisfied with the status of all the files added to the staging area, the staging area is committed to the repository. Now a snapshot with the changes is stored in Git together with an identification code and potentially a few comments about the changes
Assignment
Follow the instructions below to learn how to create a repository and add a file to it. Note that the instructions are not always complete! More information about commands can be found in this manual, typing $ <command> -h (for help) or searching the internet.
- open a terminal (on Windows
Command Promp) and create the directorygittest - inside
gittestcreate a Git repository withgit init -
first setup your identity in the global Git settings for future use. This has to be done only once on your computer:
$ git config --global user.email "<email address>" $ git config --global user.name "<full name>" -
create a file with some content and add it to the staging area with
git add - inspect the status of your repository with
git status - commit the staging area to the repository with
git commit - again inspect the status
- edit the file and change the content
- inspect the changes in the file with
git diff - add the file to the staging area and check the status again
- reset the staging area and remove the additions to it with
git resetand check the status - check what happens when trying to commit. Do you understand what’s happening?
- now add the file (again) and commit it
- inspect the log of the repository with
git logto see all commits - keep this directory and the contents for future use!
Moving repository to server
Having only a local copy of your repository is not very safe and makes development on other computers impossible. This issue can be solved by moving the repository to a server. The repository can then be cloned to create a local copy on each computer that you use. To do so you first need to create a new project in GitLab. After that you must reconfigure the local repository on your computer to use the server for central storage and finally push the local repository to the server.
The GitLab server we will be using during this course can be accessed with this URL:
Important
Make a note of this link as you will be using it frequently during the course.
Assignment
- visit https://gitlab.tudelft.nl and login with your NetID. Create a password if this is the first time you login
-
create a new empty (blank) project:
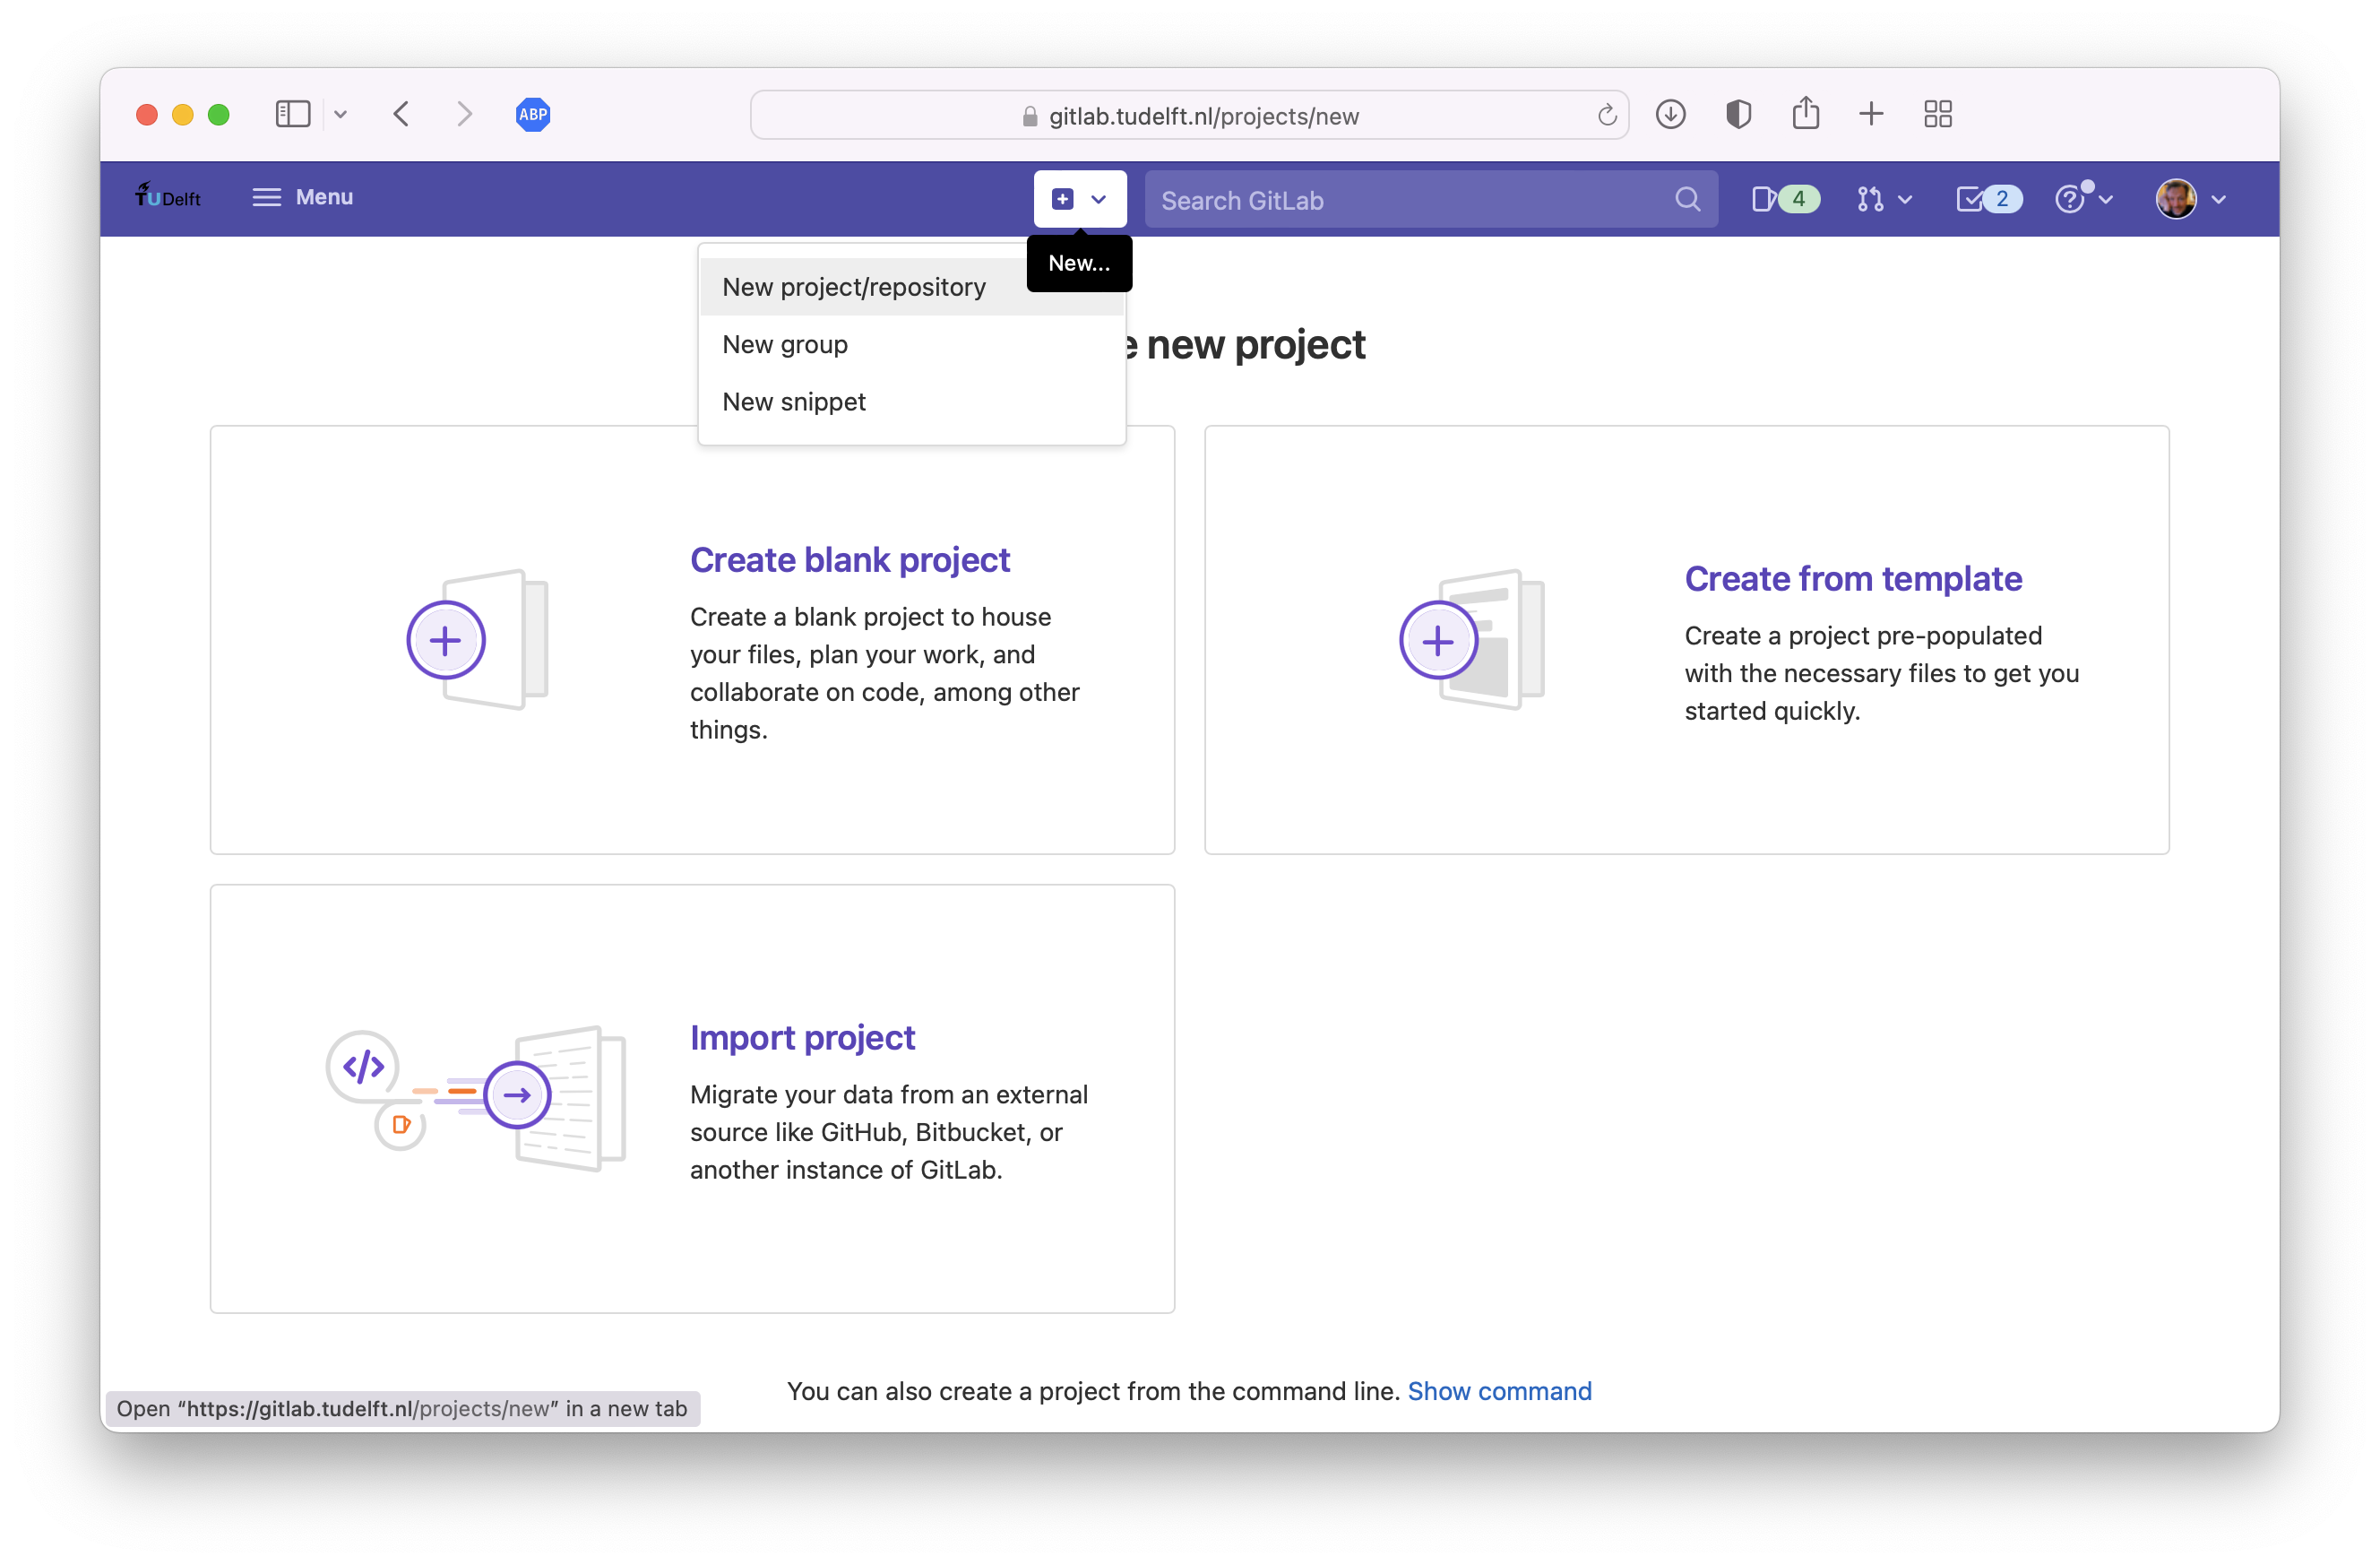
-
name your project
gittestand make sure that your username is selected in the Project URL dropdown menu: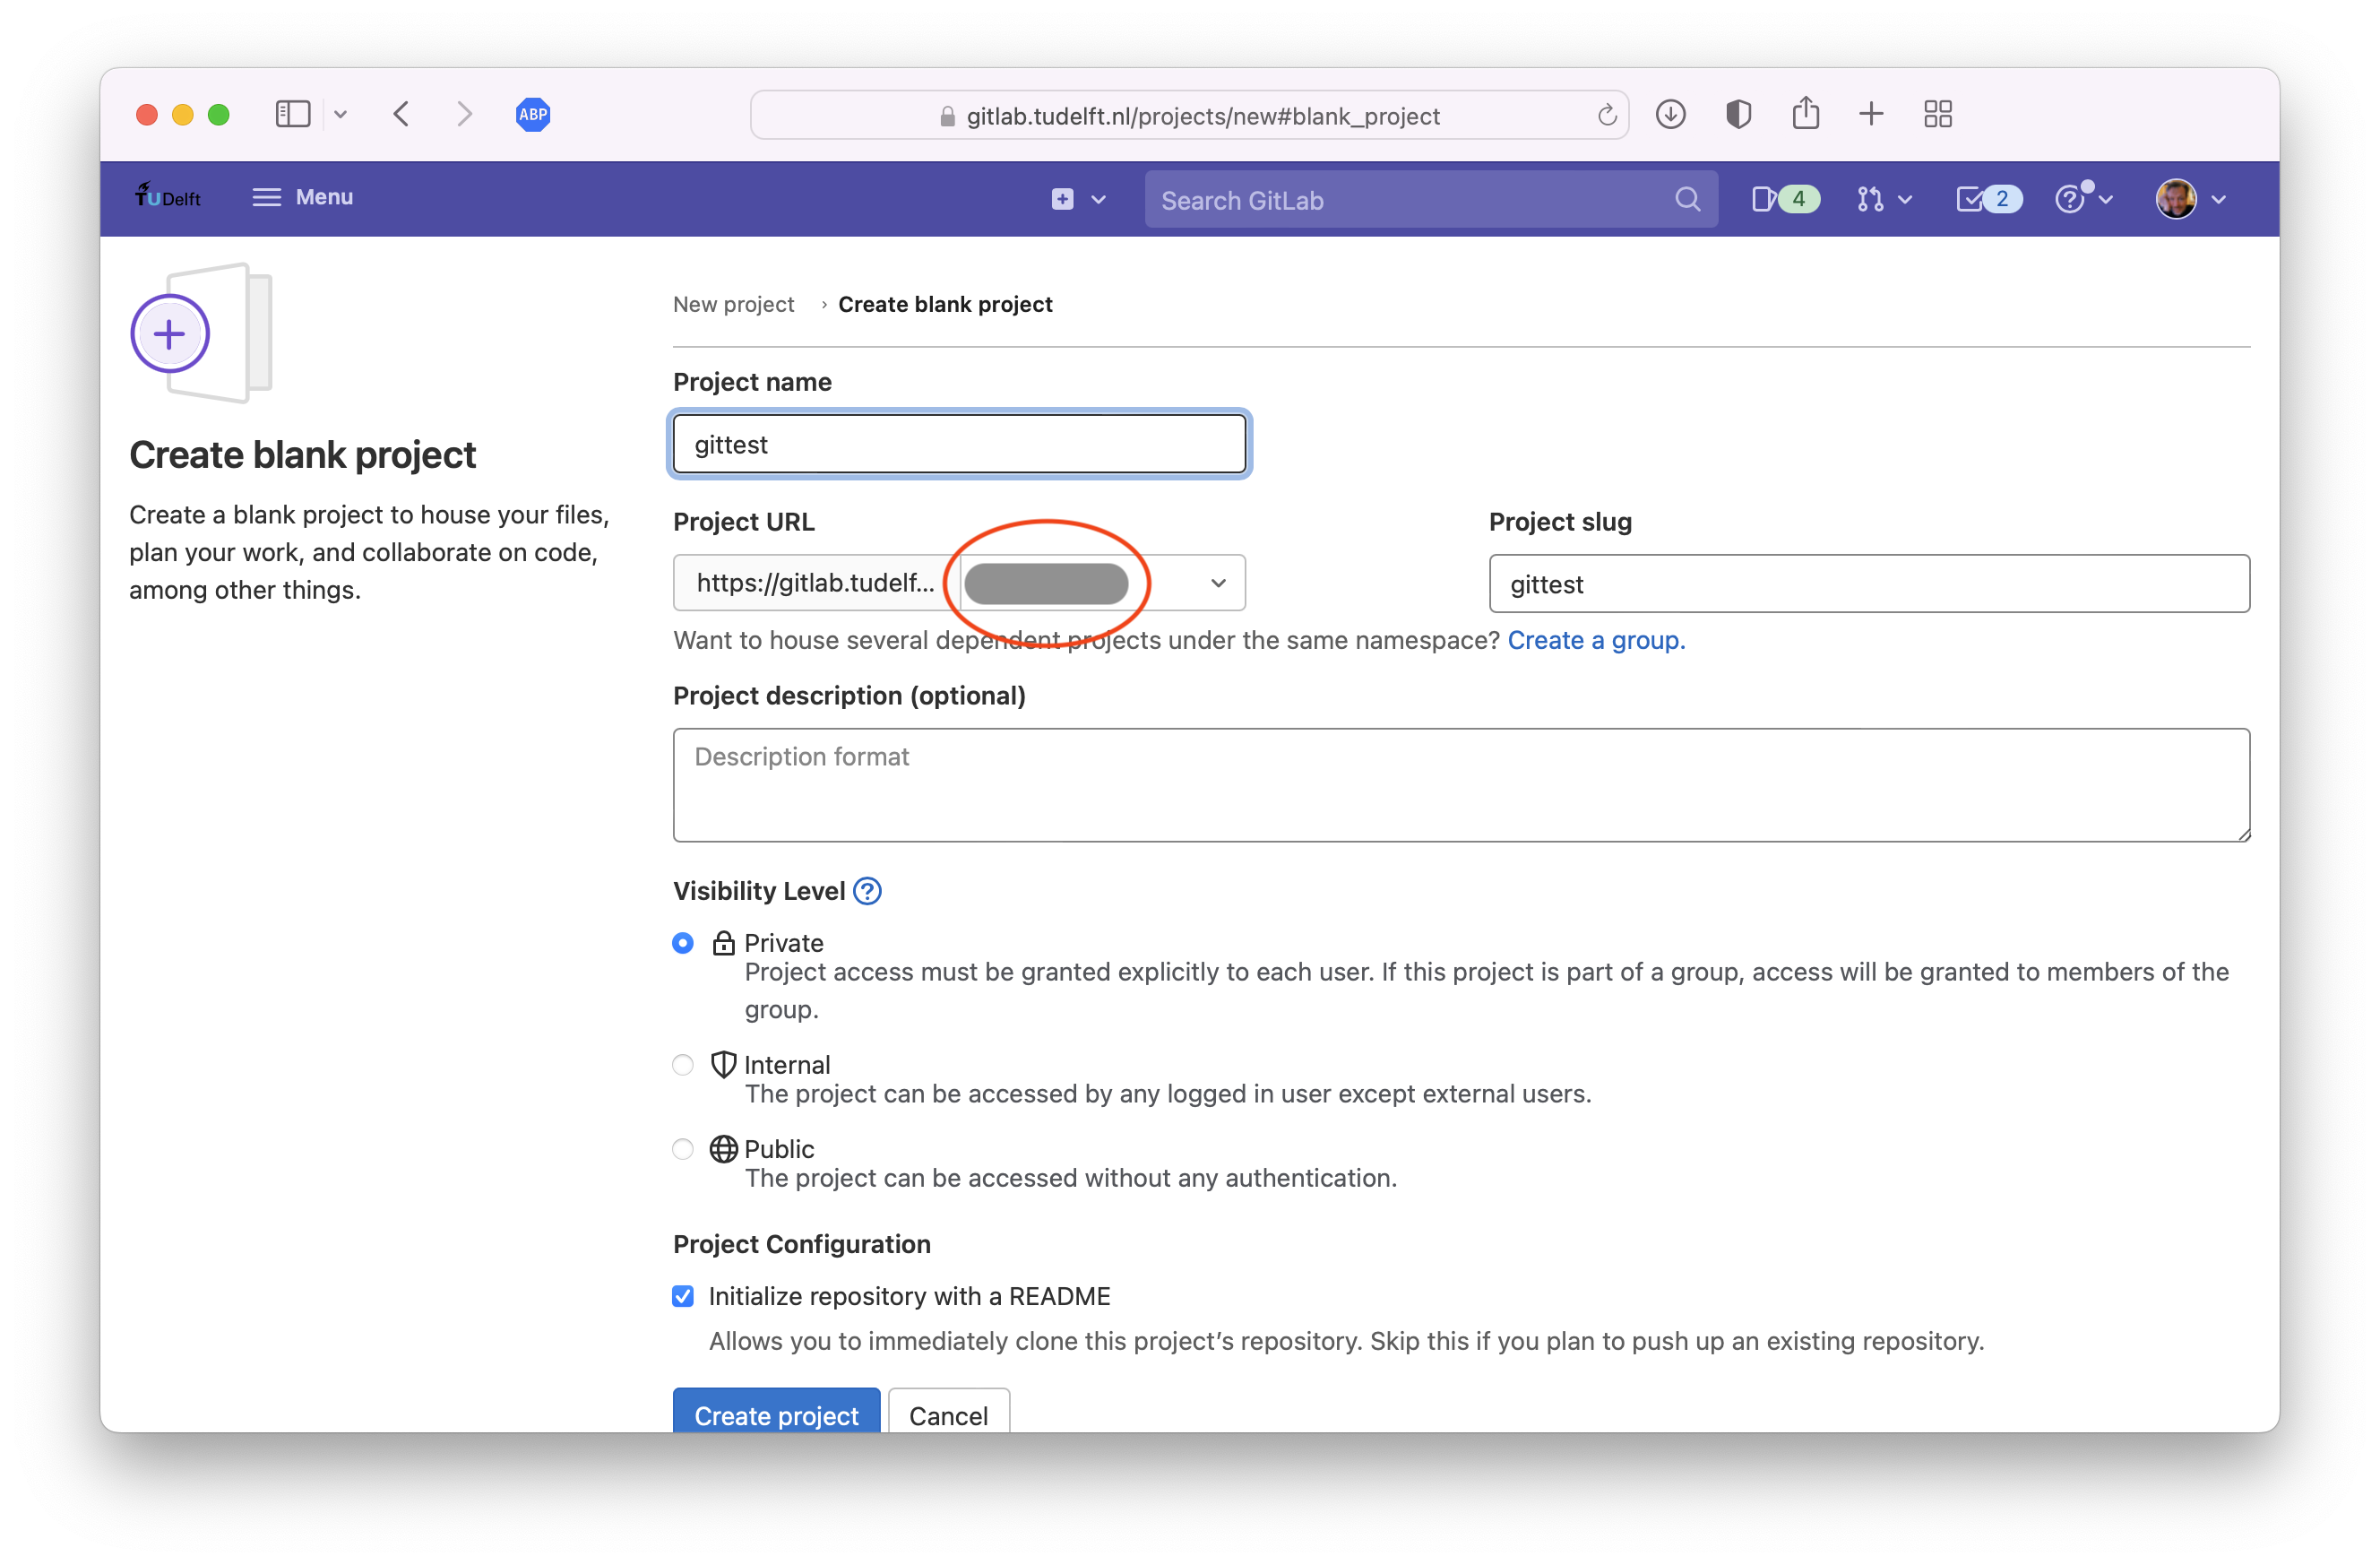
-
some information is now shown on how to use the empty project that you just created. Read all information carefully, but for now only carry out the commands under Push an existing Git repository on your local computer to have your local repository use the GitLab server:
cd gittest
git remote rename origin old-origin
git remote add origin git@gitlab.tudelft.nl:<username>/gittest.git
git push -u origin --all
git push -u origin --tags
Note
While doing this you can disregard the warnings after the
renamecommand. Change<username>to your GitLab username as selected in* Project URL *during the creation of the new project (use\in case you used spaces in your name). Also, notice the.gitextension; do not remove this! -
your local repository is now using the GitLab server for central storage. With the last two
git pushcommands all files in the repository are send to the GitLab server. Check this by clicking on the Project Overview menu-item (the icon of a little house) on the left-hand side of the GitLab page - also check the commits made in the previous assignment by clicking on the Repository→Commits menu-item on the left-hand side
Collaboration and cloning
Having the repository available on a central server will allow for other developers to collaborate with you on your code. Therefore, you will need to configure GitLab to allow other users to access your repository. This can be done with the Members menu-item on the left. After that the developers can clone your repository, make changes and push these back to the server. For the following assignment you will not actually add other members but you will learn how to clone an existing repository:
Assignment
For this assignment we will start with a clean slate and remove the local version of the repository on your computer created and used in the previous assignments. Do not worry! If you pushed your repository to the server if will still be there after removing the local version.
- remove the entire repository on your computer by deleting the complete
gittestdirectory -
goto the GitLab Project overview page of your repository and click on the clone button on the right and copy the URL below Clone with SSH:
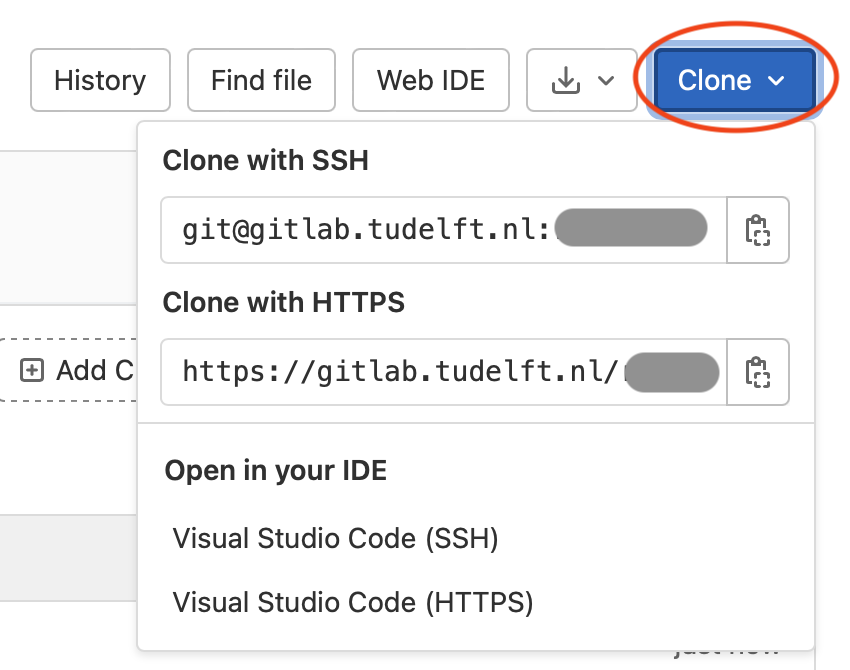
-
on your computer open a terminal and give the clone command using the URL from above:
$ git clone git@gitlab.tudelft.nl:<username>/gittest.gitmost likely the URL will contain your username instead of
<username> -
as a consequence a new directory is created with the name of your repository. Go to this directory and check the status of the repository. Also, check the remote configuration with
git remote -v - as before make some changes to (one of the) file(s), add them to the staging area and commit
-
finally, the changes are send back to the server with
git pushImportant
Actually, we have skipped an important step. Before every push you must always check if there have been other commits send to the repository since the last time you retrieved it yourself from the server. In this way any merging conflict will be solved before pushing your changes. This is done with:
$ git pull
$ git status
$ git push
Essentially, the
pullcommand will retrieve the latest changes from the repository.
When you clone a repository the script with the loop at First Iteration changes somewhat into:
$ git clone <URL>
### BEGINNING OF THE DAY
$ git pull
### LOOP
# write code in <file>
$ git add <file>
$ git commit -m "<comment about changes>"
### END LOOP
$ git pull
$ git status
$ git push
### END OF THE DAY
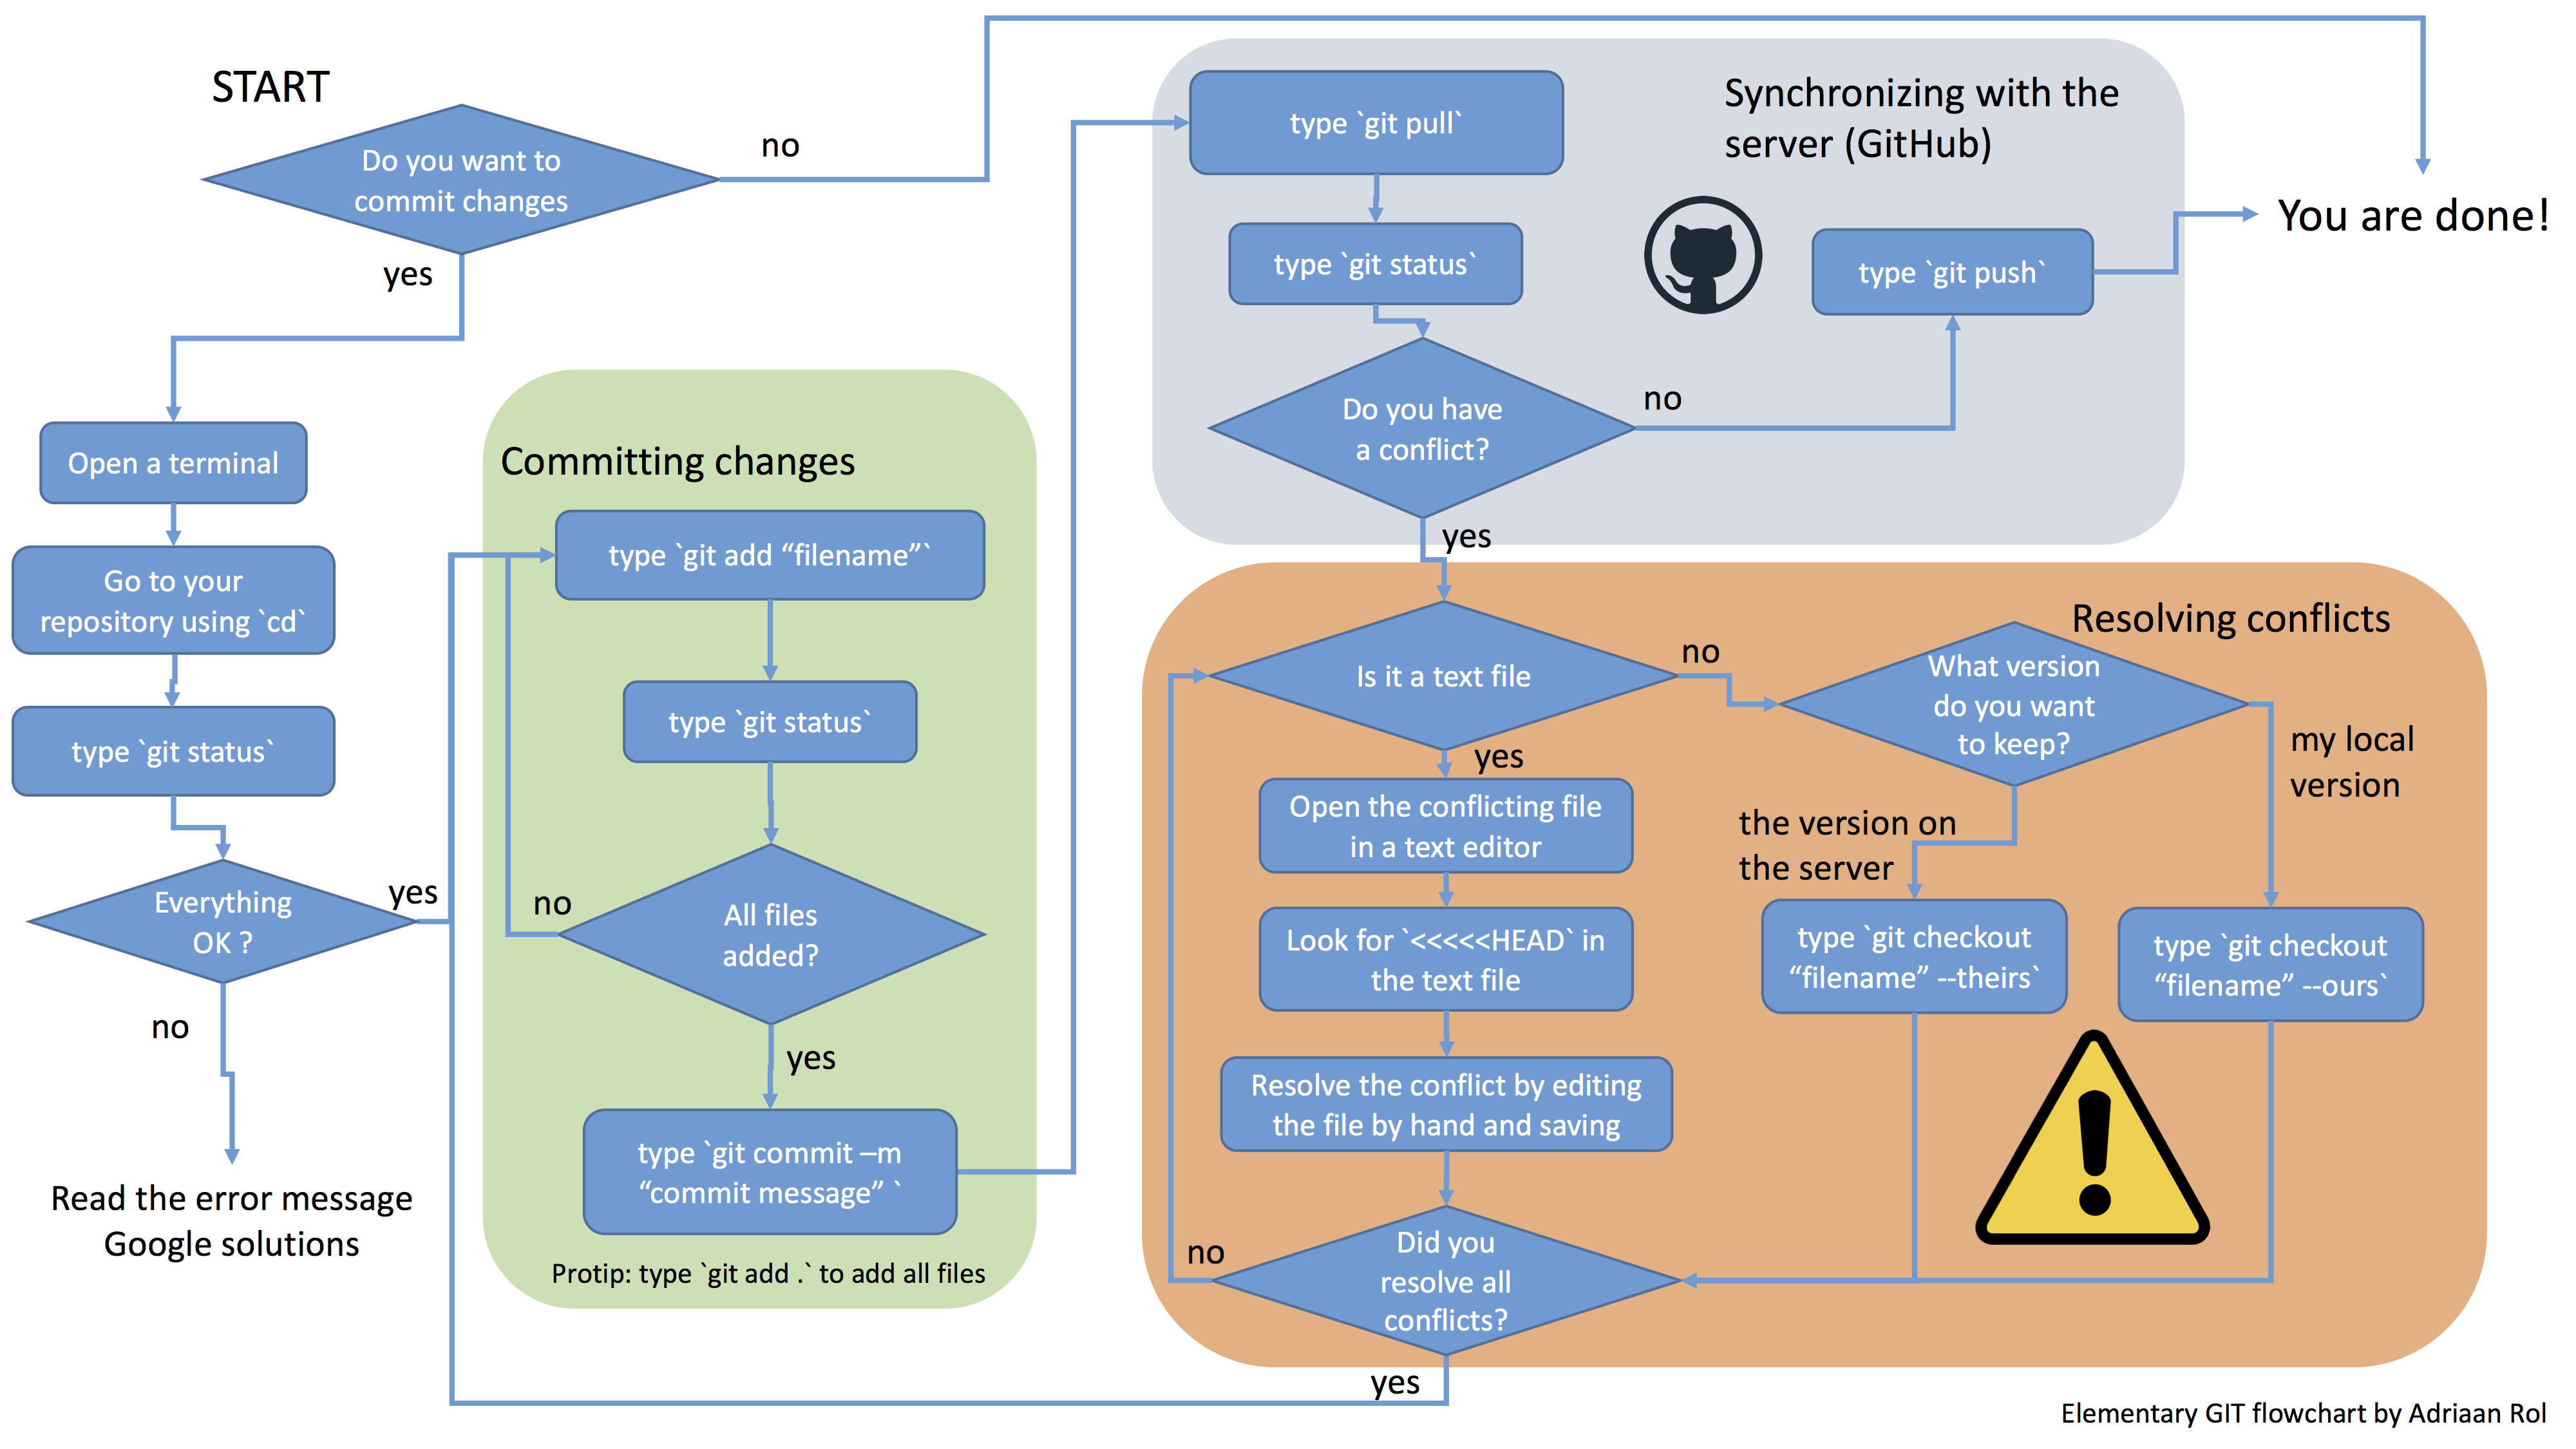
We are very happy with for the Git flowchart below which illustrates all possible basic Git steps you will use in your daily life during our course and have used in the assignments so far:
This concludes this session about Git and GitLab. More information about these topics can be found on the internet. The following links will help you further along the road: